What Are Index and Alpha Transparency?
There is often confusion between index and alpha transparency. What are they? When do we use them? How do we create them?
Index Transparency
Index transparency is the simpler. A GIF file has two parts: a color table and the image pixel data. The color table is a list of the colors used in that image (an 8-bit GIF can have up to 2^8 = 256 colors in the color table, but a 4-bit GIF can have only 2^4 = 16 colors), and each color is assigned a number. The image pixel data are for the image itself, and each pixel is assigned a number that points to its color in the color table. For example, if color #10 in the color table is red (#FF0000), then any pixel in the image with the number 10 will be displayed as red. The colors in the color table will vary from GIF file to GIF file based on the image itself; color #10 will not always be red. The color table is the set of up to 256 colors necessary to render that image.
When we add index transparency, every color in the color table is given a transparency designation in addition to its color data (i.e., RGB values):
- zero (o = False in Boolean algebra) means do not display this color, or
- one (1 = True in Boolean Algebra) means display this color.
There are no intermediate opacities; the color is either displayed or it is not. The end result is that a pixel with an index transparency color will not be displayed and whatever is in the background behind that pixel will show through. For example, if color #10 is red (#FF0000) and is designated as transparent (index transparency = 0), then any pixel that is color #10 will not be displayed and the background will show through.
There can be multiple transparent colors in index transparency, because every color in the color table has a designation of either opaque (1) or transparent (0). Most graphics programs assume that the canvas color (often white, but it could be any color) is the default transparent color, but you can specify any color (or any number of colors) as transparent or not.
This type of transparency is very common in GIF and PNG8 files and is easy to identify, because there is no fading, there are no partially transparent pixels, and the edges are often described as “hard” or “pixelated.”

Alpha Transparency
Alpha transparency is more complex. Every color in a graphic has an alpha channel value to indicate how transparent it is (i.e., the degree of opacity.) When you see references to the RGBA color space, the color is defined by the (R)ed, (G)reen, and (B)lue channels, and the (A)lpha value defines the opacity for that color where:
- zero (0) = completely transparent (there is 0% rendering of that pixel’s color – all of the background “shows through”), and
- one (1) = completely opaque (there is 100% rendering of that pixel’s color – none of the background “shows through.”)
Alpha transparency is a way to support gradations of opacity on a continuum. Values between zero (0) and one (1) allow some of the background to “show through” and “mix” with that color. Values closer to zero (0) show more background, and values closer to one (1) show less background. A range of opacity makes it possible to create graphics that fade away or have smoother edges.

PNG32, PNG24, and Alpha Transparency
In Adobe Fireworks, alpha transparency is most often used with the PNG32 format. In a PNG32 file, there are four bytes (8 bits per byte) for each color: (R)ed, (G)reen, (B)lue, and (A)lpha, which adds up to 32 bits per color (24 bits for color and 8 bits for opacity via the alpha channel.) This means that alpha transparency in a PNG32 file is one (1) byte (8 bits) and can have a value from 0 (0%) to 255 (100%). Each step in the opacity continuum for 8-bit alpha transparency equals a 0.392% change in opacity; this is small enough that our eyes see a relatively smooth change along that opacity continuum.
Note that Adobe Photoshop uses the name PNG24 for the same 32-bit file type, because it only counts the three RGB color channels, but a Photoshop PNG24 does support alpha transparency (and really should be called a PNG32, because each color has four bytes, or 32 bits, of color and opacity data.) The PNG24 format in Fireworks includes only the three RGB color channels and does not support any transparency.
PNG8, GIF, and Alpha Transparency
You may also have seen references to alpha transparency support in PNG8 files exported from Adobe Fireworks. For many years this has been a way to display alpha transparent images more cleanly in Internet Explorer 6, because Internet Explorer 6 does not support PNG32 with alpha transparency, but it treats a PNG8 file with alpha transparency like a GIF with index transparency. The result is not as smooth and aesthetically pleasing as true alpha transparency, but it also avoids the “grey box of doom” that Internet Explorer 6 would normally display for the PNG32 with alpha transparency file. Luckily, Internet Explorer is no longer a dominant browser, but there are enough people still using it that this PNG8 technique is still useful.
So, how does PNG8 support alpha transparency? It adds a four (4) bit alpha channel to the color table for the PNG8 file. This increases the file size slightly, and there are only 16 levels in the opacity continuum (2^4 = 16 levels, where 2^8 = 256 levels for PNG32 alpha transparency), so a gradual fade is more likely to look pixelated or exhibit banding.
If you look in the Optimize panel in Adobe Fireworks, you will notice that the GIF file format has three choices for transparency: None, Index, and Alpha. However, GIF files do not support alpha transparency, so the Index and Alpha options work exactly the same way. (I suppose that alpha transparency should not even be offered as an option for the GIF format, since GIF only supports index transparency.)
Creating Images with Alpha Transparency
The most obvious examples of alpha transparency are glows and shadows: they seem to fade as they get farther from the object, and when placed over a background pattern or image you can see that more and more background “shows through” as the glow or shadow gets lighter.

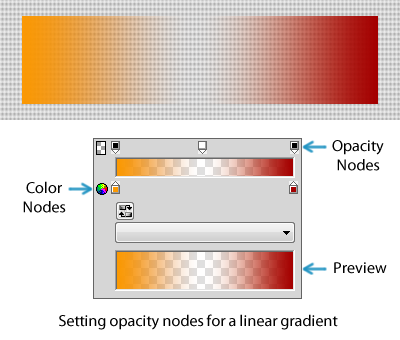
You can also create an opacity continuum with alpha transparency by:
- Creating a gradient fill and setting the opacity at one end to 100% and to 0% at the other, and you can even create bands of transparency by inserting multiple opacity points along the gradient:
- Applying a grayscale vector mask to an image:

Using a grayscale mask works by calculating the opacity of an image pixel based on the amount of white in the mask pixel:
- If the mask pixel has 0% white (i.e., it is black, #000000), then 0% of the image pixel is shown (i.e., the image becomes completely transparent),
- If the mask pixel has 100% white (i.e., it is white, #FFFFFF), then 100% of the image pixel is shown (i.e., the image is completely opaque),
- The shades of grey between black and white produce graduated opacity, and the image appears to fade from transparent to opaque along a gradual continuum.
Filter: Convert to Alpha
Finally, Adobe Fireworks provides the ability to take any image or object and calculate the alpha transparency based on the luminosity of each color by adding a filter (Filters > Other > Convert to Alpha.) The lighter the original color, the more transparent it becomes. The darker the original color, the less transparent it becomes. The end result is a grayscale image where lighter grays are more transparent than darker grays. This is useful if you want to create a mask to help isolate or extract a portion of an image or superimpose one image over another and have the two images appear to blend.

Photographs, JPEGs, and Transparency
Most images with transparency are graphics like logos and icons. There is a reason we rarely see transparency with photographs: the consolidation of colors in the color table for GIF and PNG8 files reduces the number of colors from many to a few.
When you have a photograph, there is a wide range of colors – usually far more than the 256 limit imposed by an 8-bit image format – so when you constrain the color palette of an image to 256 or fewer colors, the graphics program must calculate which colors are near one another and then assign them all to the same color value. For example, anything that is “near white” will be assigned to “white”, and when white is a transparent color, anything “near white” in the original image will also become transparent. This is simply the way that any 8-bit image format works – 8 bits only allow for 256 colors, so all “near colors” are combined into a single color value. All of the “near reds” become red, all “near blues” become blue, etc. This makes it possible to represent the image relatively accurately with far fewer colors.
This is also why 8-bit formats (GIF, PNG8) are not good for photographs: there are simply too many colors in most photographs to be accurately rendered with 256 or fewer colors. The JPEG format allows for many more colors, but it does not support transparency, and it is a lossy format (i.e., it uses compression algorithms that compress the image data, therefore some original image data are lost.)
For more information about alpha transparency and how it is calculated, read about Alpha Compositing on Wikipedia.
Good article! This is like transparency for dummies. I like it.
Excellent overview of index and alpha options (and of Fireworks features in that area). Thanks Dave — I hope to read more articles of this sort here! 🙂
Yes, fabulous and informative article on transparency. Would you say PNG32 is an acceptable format for photographs?
Tony,
Good question. Both JPEG and PNG32 use 24-bit color, so you won’t lose any color depth with a PNG32 (or a PNG24). PNG32 would allow alpha transparency, where JPEG does not support any transparency, so it is possible to create some unique effects with partially transparent photographs.
However, JPEG is uses a “lossy compression format” and will nearly always produce smaller file sizes than a PNG24 or PNG32, but the smaller file size is at the cost of some detail in the photo. JPEG also gives you the ability to control the lossiness, or the level of compression. If you save a JPEG out at 99% quality, there is only a small loss of detail (a near perfect photo) but a large filesize. If you save a JPEG out at 80% quality (common on the web), there is much more detail lost, but the filesize will be smaller.
Most photos contain regions with great similarity and low levels of detail or pattern, and the JPEG format focuses compression on areas where there is little noticeable fine detail. For example, if you take two JPEGs of the same dimensions, but one JPEG is of a tree and mostly clear blue sky and the other is a of a crowded stadium with thousands of people, and you export them with the same quality level, then the photo of the tree and sky will have a much smaller file size than the photo of the crowded stadium, because there is little detail in the sky (hence large compression opportunity), but there is much detail in the stadium (hence small compression opportunity.)
You really notice the lossiness of the JPEG format if you place text over the photograph and export it at medium (80%) quality. You’ll get a smaller file size, but you will also see artifacting around the text. The text looks blurred and pixelated around the edges. This occurs because the JPEG compression algorithm combines adjacent pixels, so the pixels of the text combine with the pixels of the photo, and we get odd pixelated effects at the boundary of the text and the photo. PNG24 and PNG32 formats will not produce this pixelated effect around text, because they are lossless formats, but they will produce large file sizes.
There is a compromise available in Fireworks! If you need the smaller file size and ability to control the compression level of the JPEG format for photographs, but you also need to flatten text into the exported image and you want to avoid the pixelated boundaries around the text, then you can use the Selective JPEG option in Fireworks.:
(1) In the Optimize Panel, select JPEG then click on the pen and paper icon to the right of Selective Quality,
(2) a dialog for Selective JPEG Settings will open – check Enable Selective Quality; you can now choose the quality level and color for the overlay that will identify which area(s) of the image will be exported with a different level of compression, then press OK
(3) use the bitmap marquee tool to highlight the region of the image where the selective JPEG quality will be applied, then go to Modify > Selective JPEG > Save Selection as JPEG Mask
(4) a region the shape of the marquee will be filled with the Selective JPEG overlay color, and everything under that region will be exported with the Selective JPEG quality level
(5) if you want to flatten text into a photo and avoid the pixelated boundaries, you do not need to mask out the text area – simply go to Modify > Selective JPEG > Settings, then make certain that Enable Selective Quality is checked and also check Preserve Text Quality. Any text over the photograph will be exported at high-quality to avoid the pixelation, but the remainder of the photograph will be exported at the quality level specified in the Optimize Panel.
Hope this helps,
Dave
Thank you so much for clarifying this!
This is the BEST article I have read on index and alpha transparency.
Thank you.