Creating Tables for Designs in Adobe Fireworks
One of the most common page elements we need when creating wireframes and comps are tables, and one of the most common questions about Fireworks is how to quickly and easily draw tables like this without having to draw and position many (even dozens or more) individual rectangles for each table cell:
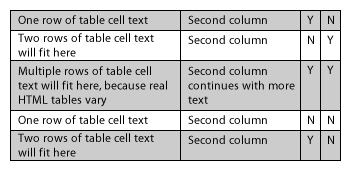 When we create wireframes and comps we often are not yet certain how many rows or columns a table will need, and the row widths and column heights may vary throughout the table. If the tables are drawn with individual rectangles or even with individual intersecting lines, it can take much time, effort, and attention to detail to change the size of the overall table. Fireworks offers two autoshapes that can make creating tables a bit faster and easier.
The Grid and Swipe autoshapes can be used to create tables, but each of these autoshapes will create tables with different features. When you first drag them out from the Auto Shapes panel and place them on the canvas they will look something like this:
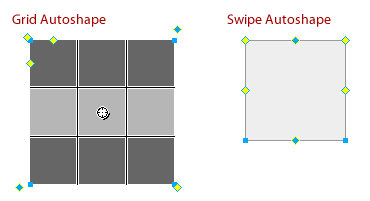
Fireworks autoshapes are special drawing objects that be modified using their different control points and handles, and they remain editable as long as they remain autoshapes. (If you ungroup an autoshape it will lose all of its special control points and handles and become a normal vector object. Once ungrouped it cannot be turned back into an autoshape.)
Using the Grid Autoshape
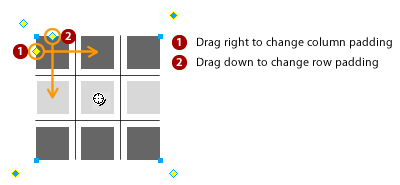
The Grid autoshape has multiple control points and handles:
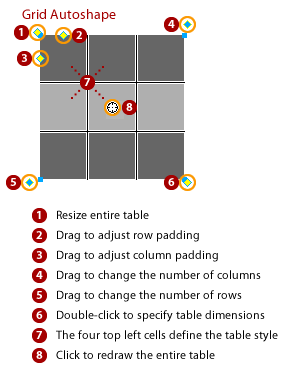 The Grid autoshape offers the ability to change the horizontal and vertical cell padding for all cells in the table (while the Swipe autoshape cannot do this):
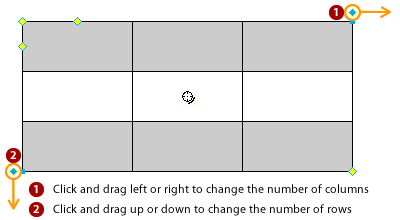
There are also control points for changing the number of rows and columns:
Although the Grid autoshape can quickly create tables, one limitation is that all of the rows must have the same height and all of the columns must have the same width. The row height is always the total height of the table divided by the number of rows, and the column width is always the total width of the table divided by the number of columns. Although this may be sufficient for quick wireframes, it is often unrealistic for actual tables on real web pages where rows and columns may have variable heights and widths.
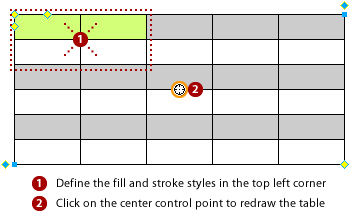
Styling the cells in tables created by the Grid autoshape is easy. The styles assigned to the four cells in the top left corner of the table will be repeated throughout the entire table:
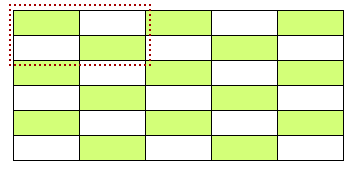
To create a table with alternating fill colors in the rows, use the Subselection Tool to select table cells and give the top two cells in the corner a different fill color than the bottom two cells, then click on the center control point to redraw the table.
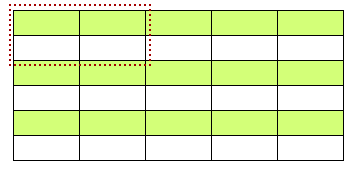 To create a table with alternating fill colors in the columns, use the Subselection Tool to select table cells and give the left two cells in the corner a different fill color than the right two cells, then click on the center control point to redraw the table.
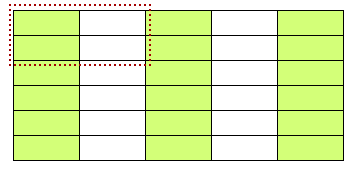 To create a table with a checkerboard fill, use the Subselection Tool to select table cells and give the diagonal cells a different fill color from each other, then click on the center control point to redraw the table.
Finally, the entire table may be resized with the top left and bottom right control handles. You can either drag the corner to change the size of the entire table, or you can double-click the control handle and enter specific dimensions in a dialog.
Using the Swipe Autoshape
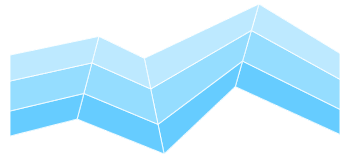
The Swipe autoshape does not appear to have been originally intended to create tables, it appears to have been intended to create design elements and shapes like this:
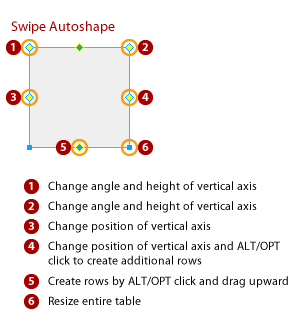
However, it can be used to create tables with multiple rows and columns that can have variable heights and widths. The Swipe autoshape has multiple control points and handles:
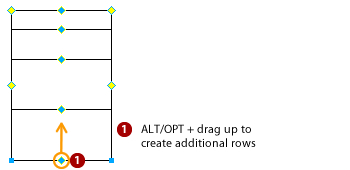
When the Swipe autoshape is first dropped on the canvas, it has only one cell. Before adding rows and columns, adjust the height of the shape to be the desired height of the entire table, then use the bottom center control point to create rows within the table:
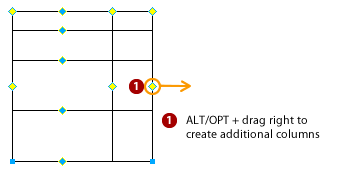
Once you have the desired number of rows in the table, create additional columns to build the table:
Use the middle control points on the vertical axes to adjust the width of each column, and use the middle control points of the horizontal axes to adjust the height of each row. This can be done to produce tables with variable row heights and column widths, which is common in actual HTML tables.
If you need to create additional rows later, you will need to add rows by ALT/OPT click and dragging a row control point upward. You can add rows from the bottom middle control point or any middle control point for an existing row.
If you need to create additional columns later, you can create them within the table or at the right side of the table by ALT/OPT click and dragging the column control points on the vertical axes then adjusting the internal column widths accordingly. The Swipe autoshape can produce unexpected results if you try to create new columns by ALT/OPT click and dragging a column control point to the left, so always drag the column control points to the right.
HINT 1: Make certain that snap to grid and/or snap to guides is turned on when using the Swipe autoshape to create tables, because the control handles do not automatically maintain perpendicular lines, and you may find the rows and columns becoming skewed as you draw them.
HINT 2: The Swipe autoshape uses a Soft Line for strokes by default, but this can result in “fuzzy” anti-aliased lines in the table as you create or modify it. To retain crisp strokes for the table cell, select the entire Swipe autoshape table and change the stroke style to Hard Line.
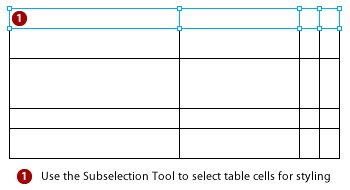
Once you have the desired number of rows and columns in the table, you can use the Subselection Tool to select individual cells and apply the desired styles to those cells. The Swipe autoshape does not have a center control point for applying table cell styles (like the Grid autoshape), so you will need to subselect all cells that will have the same style.
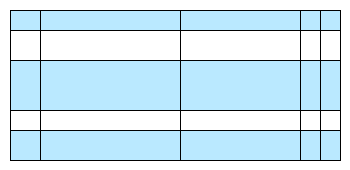
Once the cells have been subselected, it is easy to create tables with alternating rows:
It is also easy to create tables with alternating columns:
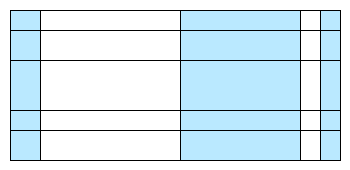 Deleting rows and columns from tables created with the Swipe autoshape can be difficult. The only way to delete rows and columns is to ungroup the Swipe autoshape and use the Subselection Tool to select and delete the nodes for the cells you want to remove, but remember that once an autoshape is ungrouped all of the autoshape editability is lost and it cannot be turned back into an autoshape.
Conclusion
The Grid and Swipe autoshapes can help you create wireframes and comps with tables more quickly than drawing the tables manually, but neither of these autoshapes will create HTML tables when pages are exported as CSS and Images. They are graphic tables only for illustration. There is no HTML Table component symbol in the Common Library, but if you would like to see this added to Fireworks in the future, you can submit features requests via the Adobe web site.
An even better solution is now available: the Tables panel: http://bit.ly/hhEK4H
Sorry it wasn’t ready before you wrote this article!